This page is intended to be a reference for new and existing players. If you are a new player, it is also recommended that you read the Beginners Guide. If the information you are looking for is not here, don't forget to check the Advanced Concepts page as well.
Controls and UI[ | ]
Controls[ | ]
NOTE: A comprehensive list of all the controls can also be accessed through the pause menu in game.
As of the current build, the controls cannot be edited.
| Key | Action |
|---|---|
| W | Плыть вверх, Jetpack, Booster |
| A | Двигаться влево. |
| S | Спрыгнуть с платформы, плыть вниз |
| D | Двигаться вправо. |
| I | Открыть/закрыть окно инвентаря. |
| C | Открыть/закрыть окно крафта. |
| X | Открыть/закрыть окно исследований. |
| Q | Прокрутить панель быстрого использование влево |
| E | Прокрутить панель быстрого использование вправо |
| [Space] | Прыжок, двойной прыжок(если есть необходиый предмет). |
| [ESC] | Открыть игровое меню. |
| [ALT]+[Enter] | Переключить режимы Fullscreen/Windowed. |
| Numbers 0-9 | Выбор слота на панели быстрого доступа. |
| Ctrl + P | Сделать скриншот (сохраняется в %darkout%/game/data/screenshots). |
| Left Click |
|
| Right Click |
|
| Mouse wheel |
|
| M | Выбор режима добычи (1 или 3 блока). |
| H | Выбор отображения HUD`а |
| [Shift] |
|
Интерфейс[ | ]
Интерфейс в Darkout должен быть знаком большинству игроков, так как его дизайн включает в себя несколько стандартных функций, таких как инвентарь и панель быстрого доступа. Подробнее об этом - написано ниже.
Панель быстрого доступа[ | ]
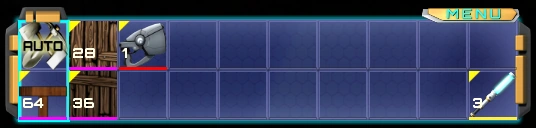
The action bar ... in action! Here we have column 1 selected which includes the 'Auto' tool discussed below.
Панель быстрого доступа... доступна! Здесь у нас есть колонка 1, в которой выбрано "AUTO" - то есть автовыбор инструментов и ступеньки.Панель быстрого доступа служит для отображения наиболее часто используемых элементов. Все элементы, за исключением инструментов (таких, как топор, лопата и т.д.) , должны сначала быть размещены на панели действий, прежде чем они смогут быть использованы. После того как вы выбрали колонку на панели действий, Нажимайте левой или правой кнопкой мыши, чтобы активировать элементы в верхней или нижней панели соответственно. При использовании оружия, оружие и боеприпасы к ему должны быть размещены в одной колонке на панели действий.
Можно выделить первую ячейку на панели действий. При изменении рельефа местности, 'Auto' слот будет использовать наиболее подходящий инструмент для блока, который вы разрушаете. Например, для копания в грязи он будет автоматически использовать лопату, но при добыче каменя, он будет использовать кирку. Это экономит место на панели действий. Следует отметить, что если у вас есть несколько версий одного и того же инструмента в инвентаре, "AUTO" слот будет использовать самые лучшие. Если вы хотите вручную изменить выбранный инструмент, нажмите на панели чуть выше "AUTO" на оранжевую полоску и выберите нужный инструмент из всплывающего меню.
Инвентарь[ | ]
Это то место, куда всё попадает, когда вы крафтите или собираете вещи в мире. Он также имеет "мусорку" - значок в правом нижнем углу, где вы можете перенести предметы, чтобы уничтожить их. Здесь вы также найдете изображение вашего персонажа с дополнительными слотами слева и справа. Левый слот - для различных частей брони, в то время как правый слот - для полезных девайсов, таких как Сапоги с ракетным ускорителем. Важно отметить, что, каждый элемент брони должени находиться в определенном слоте. Например, шлем брони должен быть в верхнем слоте брони, торс в среднем, штаны в нижнем.
Crafting[ | ]

Here we see the crafting UI with the 'Devices' category selected. You can also see that the 'Power Generator' item has been selected, which displays various properties of the recipe above the window. Other details to note include the 500 available research points and the fact that more fuel must be crafted before the power generator can be built.
In Darkout, crafting is the door to the many technological wonders you would expect from a civilisation capable of crashing escape pods into planets. Crafting is where you build your armour, weapons, placeable blocks, utility items, buildings and even where you unlock the next tier of research. The first thing you will notice is that the various crafting recipes are divided up into many different categories. It can be somewhat difficult to work out exactly which category an item falls into, but below are some general guidelines as to which type of items you will find in each category:
| Category | Description |
|---|---|
| Ammo | Everything from arrows to bullets can eventually be found in this category. If it ends up traveling towards enemies at high velocity, this is where you will find it. |
| Boosters | One time use items which enhance your character either temporarily (jump booster) or permanently (health boosters) can be found in this category. |
| Building | Everything you use to build the actual structure of your base appear here, such as walls and back walls. Some base infrastructure such as cables can be found here. Also rope. |
| Devices | Base placeables such as the furnace, workbench and Wall Power Sockets appear here. The various utility gadgets from the later tiers also appear here. |
| Lights | If it glows and wards of those nasty shadow creatures, this is where you find it. Many intermediate components used to make lights also appear here such as glow jars and light bulbs. |
| Storage | This category holds all items which exist only to serve as containers for things. Examples include chests, buckets, jars and lockers. |
| Suits | Here's where you'll find that nifty new armor set you just invested in, enjoy! |
| Tools | Everything used to work terrain and the stuff that grows on it can be found here. Axes and shovels as well as high tech axes and shovels are accommodated here. |
| Weapons | If it has no other job but to kill things, this is where it is. Unless it's ammo, then it will be under ammo. |
| Furniture | Beds, chairs and tables are the only things to be found in this category for the moment. |
| Resources | This is by far the largest of all the categories. Generally, the things you craft in this category are only used for crafting other items and are crafted from raw materials such as the various metal ores and tar. |
The items which appear on the right hand side once you select a category are all recipes for items you have unlocked. Underneath the items name will be a list of all the ingredients required for the recipe including quantities. It is important to note that not all recipes produce only one of the target item, often multiple items will be created although there is no way to tell how many of the target item a recipe makes without experimentation. Clicking the hammer to the right will begin crafting the item and some items have a quantity box where you can specify how many items you want to craft from 1 to 300 (the maximum number of items which can be stacked). If you have all the ingredients for a recipe but the hammer is still grey, clicking on the hammer will inform you of the reason. Generally it is due to a required building being out of range or unpowered. It should be noted that without switching categories, the button will not refresh when you add items to your inventory but will still allow you to craft the recipe when you click on it. Another handy tip is that you will also utilize all items in storage around your character as well as any items in your inventory, this saves you from having to carry around hoards of raw materials or tediously remove the required ingredients from your storage room.
As with research, you have a crafting queue size of four. This means that you are limited to queuing only 4 non-instant recipes at a time, although when your queue is full you are not barred from crafting instant recipes such as wooden planks.
Research[ | ]

Here, our survivor considers how much better her survival odds would be with the ability to craft a fancy copper door.
If crafting is the door, research is definitely the key. You will certainly spend some of your time in Darkout imagining all the amazing things you will be able to accomplish when you finally unlock that fancy looking gadget. Unlike the crafting menu, the research view (accessed by opening the crafting menu, and clicking research) is an uncategorised list of every research item you have unlocked and have still yet to research. Also unlike crafting, research items never require you to be near a specific building or carrying certain items, and as such you can initiate research from wherever you are in the map, whatever it is you are doing, provided you have the research points. Research is never instant and always takes some time to complete. Similarly to the crafting menu, clicking on the beaker will initiate research, whilst clicking on the recipe icon will display more information. It is recommended that you always check the crafting ingredients using this method prior to research, as many recipes have ingredients which require researching themselves.
Research points can be obtained by:
- Mining blocks
- Crafting most items (higher tier recipes generally award more points)
- Harvesting objects such as trees and plants
- Placing some objects such as buildings and torches
When you unlock a new item, it is added to the crafting menu. Generally, newly researched items which you have not yet built will have their names appearing in orange text. This means that when you build this item for the first time, it will contribute progress towards unlocking the next research tier. It is possible to check which items will help in this way by looking for the text 'Not crafted, crafting this item will help towards unlocking new blueprints' underneath the item description. You can view how close you are to unlocking the next tier at any time by looking at the bar which appears directly above the crafting queue. Note that not being able to craft an item does not prevent you from using it if you manage to find it as a random drop.
Status[ | ]
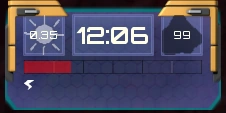
Badly hurt and in a world full of darkness, this grim status bar does not bode well for our survivor. Oh look, it's almost lunch time!
This window appears in the top centre of the screen and is always visible, it displays three pieces of information. On the left, the amount of illumination radiating from your character is displayed which directly correlates to how quickly a shadow beast will turn white and become vulnerable to normal damage. In the centre, the time of day is displayed. On the right, the amount of darkness in the world is shown, this value decreases as more of the world is covered in light.
Mining[ | ]
Of course, you won't be able to craft or research much without mining. Mining is very simple in Darkout, simply select the first slot in the action bar and left click on the terrain you wish to mine. If you wish to mine out a back wall, simply shift click, note however that this requires a sledge hammer which is not part of your starting kit. More difficult materials will take longer to mine, and some rarer materials cannot be mined without a certain level of tool. There is no ingame warning about this, it will simply allow you to strike the same block repeatedly with no effect. If you find that you cannot mine out a particular piece of terrain, also be sure to check that there are is nothing growing on it as these blocks will be un-mineable until the growing object is harvested.Pressing M key will change the number of blocks you mine, alternating from 1 to 3. If you keep selected the "All" option in the possition 0 of the action bar, it will use the proper tool to mine the material you want to deal with.
Combat[ | ]
In Darkout, combat is not only key to survival, it is also an important part of the research gathering process. Many of the higher tier items (and some of the lower ones too) require parts which can only be found by eliminating enemies.
Monsters[ | ]
All of the monsters in Darkout, with the exception of Jellies, are shadow monsters. How they came to exist on the planet is unknown and there are many different types from wolves and spiders to creatures which have some human features. Learning how to deal with these creatures and where they appear will be key in surviving and making the most of the Darkout world.
Spawning[ | ]
As mentioned above, the majority of monsters in the world are creatures made of shadow essence. It's not a big stretch then to imagine that these creatures only spawn in darkness. As such, any areas which you want to keep free from monsters (such as your base) should be kept fully lit at all times. In early parts of the game, it can also be advisable to try and keep your mines lit as you gather resources. You start out with 10 glow-sticks which are perfect for this task as they can be placed as required and subsequently removed. Any places that you intend to be visiting regularly, however, should be kept lit if at all possible. Monsters early in the game can kill you with relative ease and more powerful ones appear later on, so having important map areas lit is always a good idea.
Combat[ | ]
You may be feeling invincible with your newly crafted sword and your leather suit 2, but sadly it takes more than that to even scratch a shadow beast. Before a shadow beast becomes vulnerable to normal damage, they must first be exposed to a certain amount of light damage. Once you have done enough light damage to a creature, it will turn white and can then be safely attacked with your trusty sword or bow and arrow. Doing light damage to a creature can be accomplished by either having them exposed to light for a time or by using a weapon which does light damage (even a torch will do). As such, the most valuable weapons in the game are those that do a reasonable amount of both types of damage such as a pistol with incendiary bullets or a bow with fire-arrows. As such, your starting glow sticks are more precious to you than many of the normal damage weapons you can craft early in the game.
Healing[ | ]
No matter how well prepared you think you are, how many glowsticks you have or just how damn awesome your character may be, chances are you will eventually be killed. Death has many forms in the world of Darkout, shadow monsters being the obvious but also falling from large heights or even drowning helplessly in a tar pit may prove even more effective at ending our lone survivors life. Don't worry, however, as the only consequence of dying is a simple respawn. If you have slept in a bed you will spawn next to it (the last one you placed, if you placed more than one), if you haven't you will spawn back at your starting location. It's not all sunshine and roses though, as you spawn back with half health and early game, it can be quite difficult to heal. Sleeping in your bed is the most obvious method of getting back on your feet, but this takes a long time. It's often a good idea to get your character to sleep while you queue up research and craft items, so try to make sure your bed is close to your crafting buildings if possible. Later in the game, this becomes less of an issue as some armour sets will heal you much faster than your bed, and there are also consumables which can restore some of your precious health.
Building[ | ]

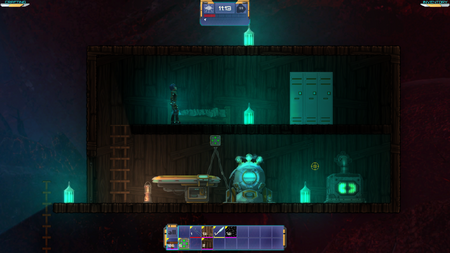
Our brave survivor awakens in her newly constructed wooden shelter. Note the importance of light to prevent the spawning of monsters inside and around her home.
One of the most creative aspects of playing Darkout is definitely the building. Do you want to live in a small wooden shack or a huge tower, an underground research facility or a cloud city? You can do any of these and more during your many playthroughs. In this area you are only limited by your own imagination and of course availability of construction material!
Refining Materials[ | ]
Unlike some sandbox games, raw materials must first be refined before they can actually be placed in the world ('built'). Anything you dig out of the ground has to be turned into building material, if that's what you want to use it for. There are essentially two types of blocks you can use for building, walls and back-walls. Generally, each raw material will allow you to refine it into at least one type of wall and one type of back-wall. Walls are blocks which appear in the foreground layer and will actually collide with the player and other world entities. You can stand on them, place buildings on them and most importantly, hide from monsters behind them. Some materials may even be refined into floor tiles, these are only aesthetically different from standard wall tiles but are designed specifically to appear like flooring. Back-walls appear in the background layer, they provide decoration but do not collide with any objects in the world although certain game items such as Wall Power Sockets must be placed on a back wall. Back walls are typically used to define the interior of a structure and later tiers of back wall come in many different styles, these are sometimes referred to as 'wall panels'.
To refine a raw material, simply look for the 'wall', 'floor', 'back wall' or 'wall panel' item which corresponds to the material you want to use and the type of block you wish to place. The following is a list of raw materials which may be refined into construction blocks:
NOTE: When refining construction material, bear in mind that you will require far more back wall than standard wall. Also remember that typically each raw material will refine in to multiple placeable blocks.
Placing Blocks[ | ]
Once you have your placeable walls, it's a simple matter of assigning them to slots in your action bar. Once you have selected the appropriate slot, remember that left clicking will place the block you've assigned to the top slot, right clicking will place the block you've assigned to the bottom slot. Of course, you can place your construction blocks in any action bar slot you wish, however for convenience it is suggested that your front and back wall are place above/below eachother so you can complete your entire building by only left + right clicking. If you made a mistake, simply mine out the block you placed (see mining).
Please note that construction blocks must be placed next to other blocks in the world (either foreground or background). This prevents you from building structures in mid air, but there are no consequences for disconnecting blocks later through mining (no cave-ins, collapses etc).
Basics of Wiring[ | ]
Wiring and power are more fully addressed in Advanced Concepts. This section is intended to provide you with enough information to get your first one or two powered buildings operational.
Once you have researched and placed the workbench, you will begin coming across more and more devices which require power. For now, it is enough to simply connect your combinator (which produces a small amount of power) to your workbench. In order to do this, you will need some electrical cable and one socket. Place the socket on the wall (NOTE: A back wall must be present for the socket to be built) and place your electrical cable in your action bar. Once this is done, click and drag between the combinator and the socket. This will then place a cable between these two points, repeat the process with your workbench and you should now be able to turn it on! If you can't, double check your wiring and make sure your combinator is turned on (shift + left click) before trying again. See the picture in the Building section for an example of a working workbench to combinator connection, with both devices powered on. Most of the wiring in the game follows this basic idea and should be enough to get you using your first powered devices, but for a more comprehensive guide to power generation and base wiring please refer to the Advanced Concepts guide.